Tub Refinishing Before And After: Stunning Bathroom Transformations

Tub refinishing before and after transformations show how an old, worn-out tub can become a fresh, like-new fixture. It’s a cost-effective way to give your bathroom a facelift without the high expense of replacing the tub.
Imagine stepping into your bathroom and seeing a shiny, pristine tub instead of one covered in stains and chips. Tub refinishing makes this possible. This process involves repairing and reglazing the surface of your existing tub. It’s a quick solution that saves time and money.
In this blog post, we will explore the dramatic changes you can expect from tub refinishing. We’ll look at the steps involved and showcase stunning tub refinishing before and after results. Get ready to be amazed by the transformation potential of your old tub!
Introduction To Tub Refinishing
Imagine stepping into your bathroom and seeing a dull, worn-out tub. It can make the whole room look old and uninviting. Tub refinishing is a process that can transform your bathtub from tired to terrific without replacing it.
What Is Tub Refinishing?
Tub refinishing involves repairing and refreshing the surface of your existing bathtub. This process usually includes:
- Cleaning the tub thoroughly.
- Repairing chips and cracks.
- Applying a new coating to the surface.
The goal is to give your tub a brand-new look and feel. This process can be used on various types of bathtubs, including porcelain, fiberglass, and acrylic.
Benefits Of Refinishing
Choosing to refinish your tub instead of replacing it comes with several benefits:
| Benefit | Description |
|---|---|
| Cost-Effective | Refinishing is usually cheaper than buying a new tub. |
| Time-Saving | The process is quick, often completed in a day. |
| Eco-Friendly | Refinishing reduces waste by reusing your existing tub. |
| Minimal Disruption | There’s no need for extensive demolition or renovation. |
Besides these benefits, a refinished tub can last for many years with proper care. It also enhances the overall appearance of your bathroom, making it a more pleasant space.

Credit: www.youtube.com
Choosing The Right Refinishing Method
Refinishing your tub can make it look new again. The right method can restore shine and remove stains. Choose a method that suits your tub’s material.
When looking at tub refinishing before and after results, it’s clear that choosing the right refinishing method can make a big difference in the final look of your tub. It also impacts durability and ease of maintenance, with several methods available—each offering unique benefits.
Let’s explore some popular techniques and key factors to consider.
Popular Refinishing Techniques
The first technique is DIY refinishing kits. These kits are available in stores and are easy to use. They include all the necessary materials and instructions. DIY kits can be a quick fix, but they may not last as long.
Another method is professional refinishing. Experts use high-quality materials and equipment. They can repair any damage and apply a smooth, durable finish. This option can be more expensive, but it often yields better results.
Lastly, there is tub replacement. This involves removing the old tub and installing a new one. It is the most expensive and time-consuming option. But it gives you a brand-new tub with no previous issues.
Factors To Consider
Cost is a crucial factor. DIY kits are the cheapest option. Professional refinishing costs more but offers better results. Replacement is the most expensive but gives you a new tub.
Time is another important factor. DIY kits can be applied in a few hours. Professional refinishing takes a day or two. Replacing a tub can take several days.
Durability matters too. DIY kits may start to chip or peel within a year. Professional refinishing can last for many years. A new tub will last the longest.
Ease of maintenance is also important. A professionally refinished tub is easy to clean. DIY kits may require more frequent touch-ups. A new tub will have the least maintenance needs.
By considering these factors, you can choose the best refinishing method for your needs.
Preparing For The Refinishing Process
Before diving into tub refinishing, preparation is crucial. Proper preparation ensures a smooth and lasting finish. This step is vital for achieving professional results.
Let’s explore the necessary tools, materials, and safety precautions for a successful tub refinishing project.
Necessary Tools And Materials
Gather all needed tools and materials before starting. You’ll need sandpaper, a putty knife, and painter’s tape. A tub refinishing kit is essential. It usually contains the primer, paint, and hardener.
Disposable gloves and a respirator mask are also important. Ensure you have cleaning supplies like a sponge, detergent, and bleach. These help to remove any grime or mildew. A drop cloth or plastic sheeting protects your bathroom floor.
Safety Precautions
Safety should never be overlooked. Wear gloves to protect your hands from chemicals. A respirator mask is necessary to avoid inhaling fumes. Ensure proper ventilation in the bathroom. Open windows and use fans to circulate air.
Keep children and pets away from the work area. Store chemicals in a safe place, away from heat sources. Follow all instructions on the refinishing kit carefully. This reduces the risk of accidents and ensures a smooth process.
Step-by-step Refinishing Guide
Tub refinishing before and after results show how an old, worn-out surface can be transformed into something that looks brand new. Follow this step-by-step guide to achieve a professional-looking finish.
This guide will help you through the process, ensuring the best results for your tub refinishing project.
Surface Preparation
The first step in refinishing your tub is surface preparation. Proper preparation ensures the new finish adheres well and lasts longer. Here’s how to prepare your tub for refinishing:
- Clean the tub: Use a non-abrasive cleaner to remove soap scum, dirt, and grime.
- Remove old caulk: Use a utility knife or caulk remover tool to get rid of old caulk around the tub’s edges.
- Sand the surface: Lightly sand the tub’s surface with fine-grit sandpaper to create a smooth, even surface.
- Repair chips and cracks: Fill any chips or cracks with a tub repair kit. Allow it to dry completely.
- Tape off areas: Use painter’s tape to protect areas around the tub that you don’t want to refinish.
Application Process
Once the surface is prepared, you can begin the application process. Follow these steps to apply the refinishing product:
- Ventilate the area: Open windows and use fans to ensure proper ventilation.
- Apply primer: Use a spray gun or roller to apply a primer coat. Let it dry as per the manufacturer’s instructions.
- Mix the refinishing product: Follow the instructions on the refinishing kit to mix the product correctly.
- Apply the refinishing product: Use a spray gun or roller to apply the refinishing product evenly over the tub’s surface.
- Allow to dry: Let the refinishing product dry completely. This may take 24 to 48 hours, depending on the product.
- Apply a second coat: If needed, apply a second coat for a smoother finish. Allow it to dry completely.
By following these steps, you can achieve stunning tub refinishing before and after results that make your tub look brand new. Proper surface preparation and careful application are key to a successful refinishing project.
Common Challenges And Solutions
Tub refinishing can transform an old tub into a new one. Yet, the process comes with its own set of challenges. Knowing these challenges and their solutions can ensure a smooth and successful refinishing job.
Dealing With Cracks And Chips
Cracks and chips in the tub surface are common issues. They can make the tub look worn out and old. Addressing these imperfections is crucial for a successful refinish.
Step-by-step solutions:
- Clean the tub thoroughly to remove all dirt and grime.
- Use a tub repair kit to fill cracks and chips.
- Sand the repaired areas to ensure a smooth surface.
- Apply a primer to the tub before the refinishing coat.
Ensuring A Smooth Finish
A smooth finish is key to a professional look. Achieving this can be tricky, but with the right steps, it’s possible.
Essential tips:
- Sand the entire tub surface evenly.
- Remove all dust and debris before applying any coat.
- Use a high-quality refinishing product for the best results.
- Apply multiple thin layers instead of one thick coat.
- Allow each layer to dry completely before applying the next.
By addressing these common challenges, you can achieve a stunning refinished tub. Remember, preparation and attention to detail are key to a successful refinishing project.
Credit: www.reglazinglosangeles.com
Aftercare And Maintenance Tips
After refinishing your tub, proper aftercare and maintenance are essential. With the right tips, you can keep your tub looking new and beautiful for years.
Let’s dive into some easy-to-follow cleaning and maintenance tips, as well as ways to extend the lifespan of your refinished tub.
Cleaning And Maintenance
Cleaning your refinished tub is straightforward. Use a soft sponge or cloth to clean the surface. Avoid abrasive cleaners and pads. Gentle cleaning products are best. A mild soap and water solution works wonders. Rinse thoroughly to remove any residue.
Dry the tub after each use. This helps prevent water spots and soap scum. Wiping down the surface also reduces the risk of mildew. Regular cleaning keeps your tub shining and smooth.
Extending The Lifespan
To extend the lifespan of your refinished tub, avoid dropping heavy objects on it. This can cause chips and damage. Always use a bath mat to prevent scratching.
Limit the use of bath oils. They can leave a residue that is tough to clean. Stick to gentle, non-abrasive products. These steps ensure your tub remains in top condition.
Lastly, avoid using harsh chemicals. Bleach and ammonia-based cleaners can erode the finish. Opt for eco-friendly products instead. They are safe for your tub and the environment.
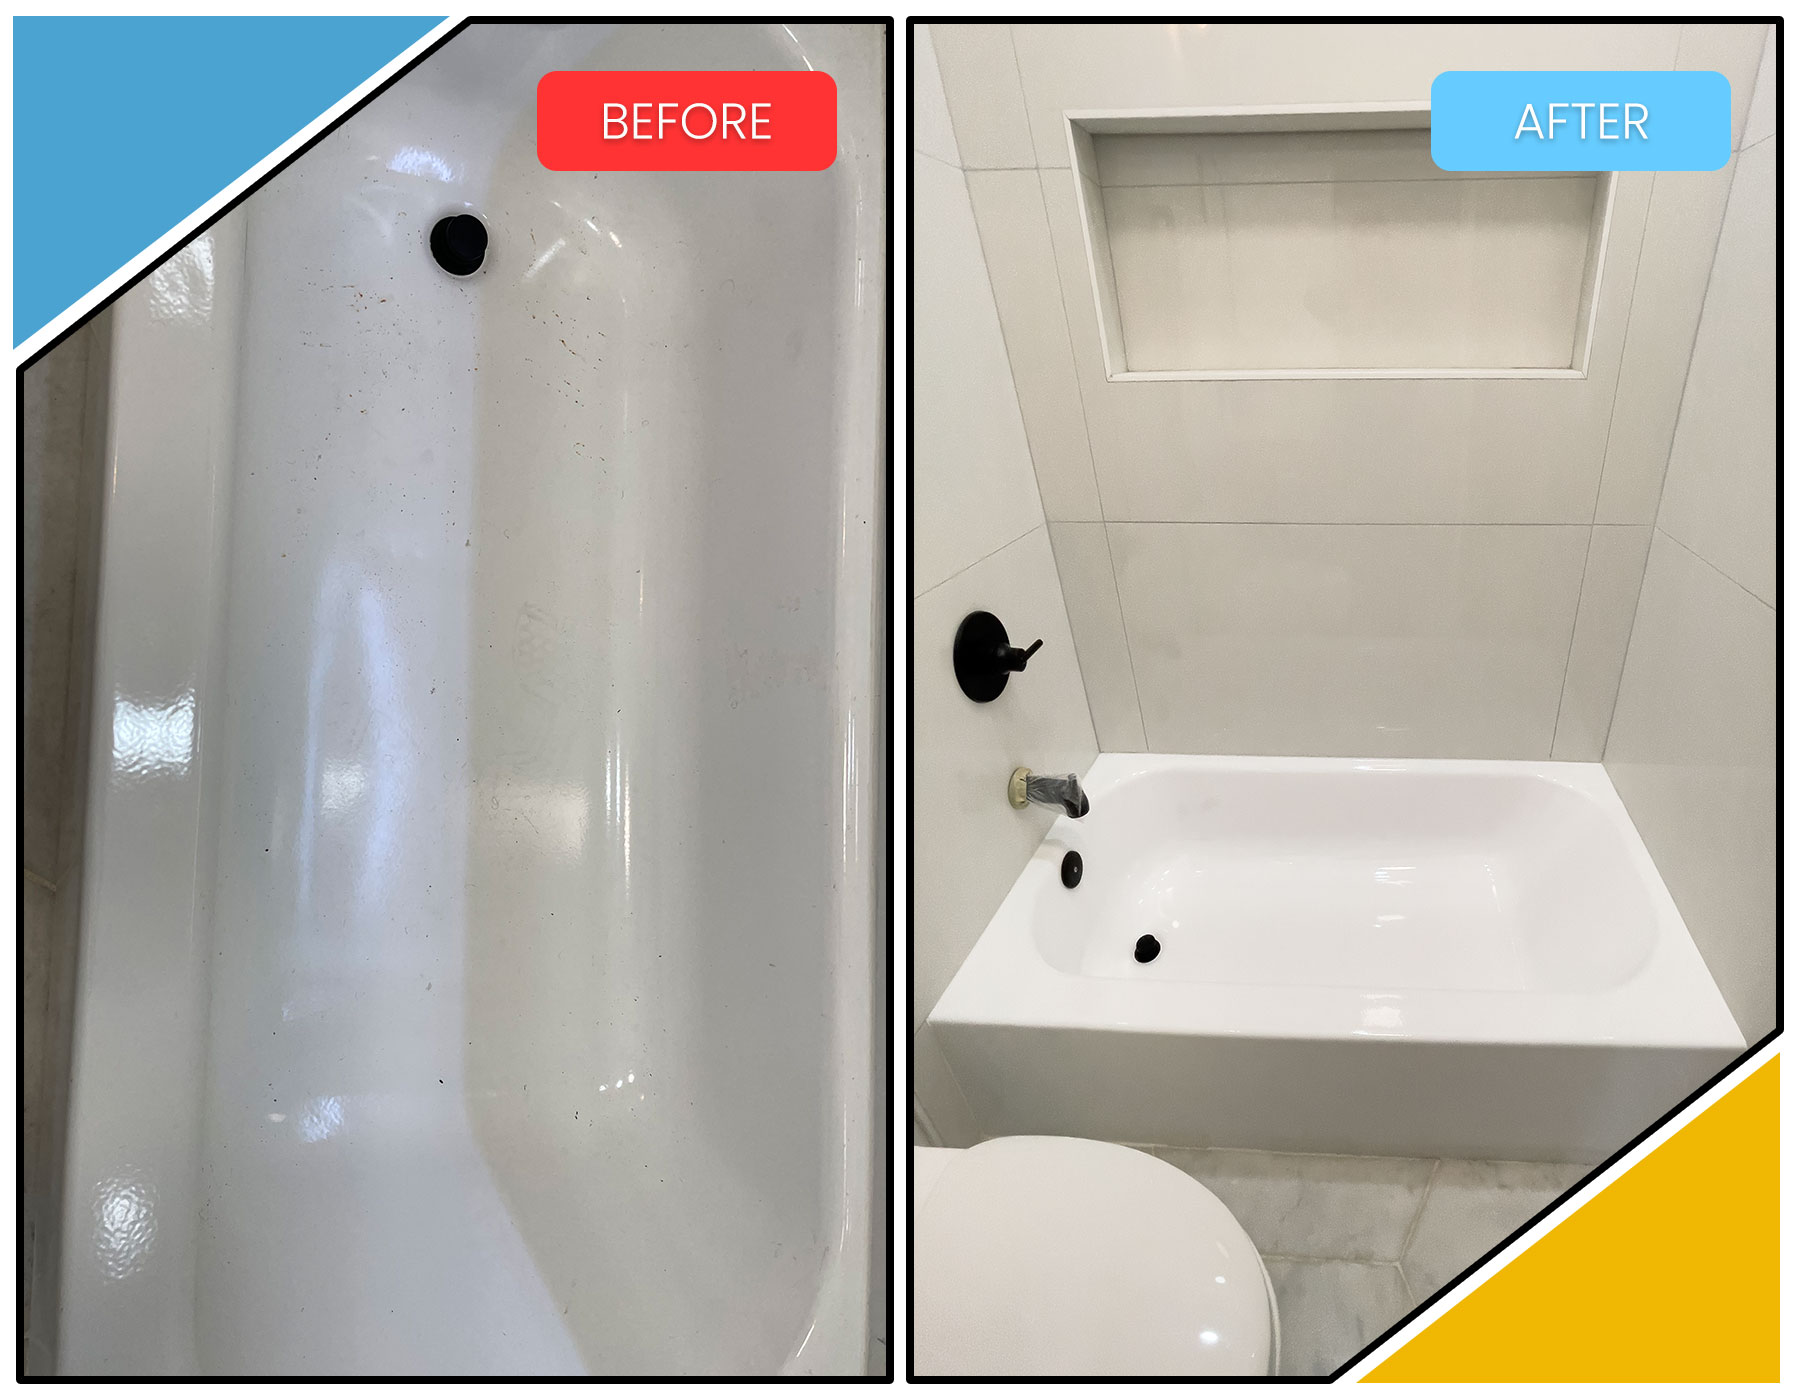
Stunning Before And After Transformations
Are you tired of your old, worn-out bathtub?
Discover the magic of tub refinishing through stunning before-and-after transformations. Witness how an old tub can look brand new again. This process can save you money and time compared to a complete replacement.
Below, we delve into real-life case studies and share tips for maximizing the impact of your tub refinishing project.
Real-life Case Studies
Let’s explore some real-life examples. They showcase the power of tub refinishing.
| Before | After |
|---|---|
| Chipped and stained bathtub | Smooth, glossy finish |
| Faded color and dull surface | Bright, vibrant color |
| Rust and hard water stains | Pristine, clean appearance |
These cases highlight how refinishing can transform a bathroom. It’s not just about looks. It also enhances durability and ease of cleaning.
Tips For Maximizing Impact
Maximize the impact of your tub refinishing with these tips:
- Choose Quality Materials: High-quality coatings last longer and look better.
- Hire Professionals: Experienced technicians ensure a smooth and even finish.
- Prep the Surface: Thorough cleaning and sanding improve adhesion.
- Maintain Proper Ventilation: Ensure good airflow for faster curing and safety.
- Follow Care Instructions: Proper maintenance extends the life of the refinish.
These simple steps can make a big difference. Your tub will look beautiful and last longer.
Cost Analysis Of Tub Refinishing
Refinishing a tub can be a smart financial choice. Understanding the costs involved helps in making an informed decision.
This section provides an in-depth analysis of the expenses related to tub refinishing and compares it with the cost of replacing the tub.
Comparing Costs With Replacement
Replacing a tub involves several expenses. It’s not just the price of the new tub. There are additional costs like demolition, plumbing adjustments, and installation fees. These can add up quickly.
Here’s a comparison of average costs:
| Expense | Refinishing | Replacement |
|---|---|---|
| Materials | $200 – $500 | $300 – $1,000 |
| Labor | $300 – $700 | $500 – $1,500 |
| Additional Costs | None | $1,000 – $2,000 |
| Total | $500 – $1,200 | $1,800 – $4,500 |
Refinishing is clearly more affordable. It saves you a significant amount of money compared to replacing the tub.
Budget-friendly Options
There are several budget-friendly options for tub refinishing. These options help you save even more.
- DIY Kits: These kits usually cost between $50 and $200. They include all necessary materials. It’s a good option if you are handy with tools.
- Professional Services: Hiring a professional ensures a high-quality finish. Prices range from $300 to $700.
- Partial Refinishing: If only a part of the tub is damaged, consider partial refinishing. It’s cheaper and still effective.
Assessing these options helps you choose the best one based on your budget and needs.
Diy Vs. Professional Refinishing
Considering tub refinishing? You might wonder whether to go the DIY route or hire a professional. Both options have their own set of pros and cons. Understanding these can help you make an informed decision.
Pros And Cons Of Diy
Many homeowners opt for DIY tub refinishing to save money. Here are some pros and cons to consider:
- Cost-effective: DIY kits are cheaper than hiring a professional.
- Convenience: You can work on your own schedule.
- Satisfaction: Completing a project can be very satisfying.
Despite these advantages, DIY refinishing also comes with its challenges:
- Quality: Professional finishes are usually more durable.
- Time-consuming: Proper refinishing takes a lot of time and patience.
- Risk of Mistakes: Errors in the process can lead to poor results.
Hiring A Professional
Hiring a professional can offer a more reliable outcome. Here are the benefits:
- Quality: Professionals use high-quality materials and techniques.
- Efficiency: The job is often completed faster.
- Expertise: Professionals have the experience to handle any issues.
However, there are some drawbacks to hiring a professional:
- Cost: Professional services can be expensive.
- Scheduling: You need to work around their availability.
- Trust: Finding a reputable professional can be challenging.
Whether you choose DIY or hire a professional, both have their own set of advantages and disadvantages. Weighing these can help you decide the best route for your tub refinishing project.
Frequently Asked Questions
What Is Tub Refinishing?
Tub refinishing is the process of restoring a worn-out bathtub. It involves repairing surface damage and applying a new finish.
How Long Does Tub Refinishing Last?
Tub refinishing can last 10-15 years with proper care. Avoid harsh cleaners and prevent chipping for longevity.
Can I Refinish My Tub Myself?
DIY refinishing kits are available, but professional refinishing is recommended. It ensures better results and durability.
Is Tub Refinishing Cost-effective?
Yes, tub refinishing is more affordable than replacing a bathtub. It can save you up to 75% of replacement costs.
Conclusion
Transforming your old tub can be simple and rewarding. Tub refinishing saves money and time. The process brings new life to your bathroom. The results can be stunning. You avoid the hassle of a full replacement. Your tub looks fresh and clean.
This upgrade boosts home value too. Consider refinishing for a cost-effective bathroom improvement. It’s an easy way to refresh your space. Give your tub a new lease on life. Enjoy a beautiful, renewed bathroom.