Staining Fiberglass Door: A Step-by-Step Guide to Perfection
Staining fiberglass doors can seem tricky at first. But it can transform your door, giving it a rich, elegant look.
Staining fiberglass doors is popular for their durability and low maintenance. Yet, many homeowners want to enhance their appearance with a wood-like finish. This is where staining comes in.
Staining a fiberglass door not only boosts its visual appeal but also adds a layer of protection. The process might seem daunting, but it can be straightforward with the right tools and steps.
This guide will walk you through the basics of staining a fiberglass door. Whether you’re a DIY enthusiast or a beginner, you’ll find this guide helpful.
Let’s get started on making your fiberglass door look stunning.

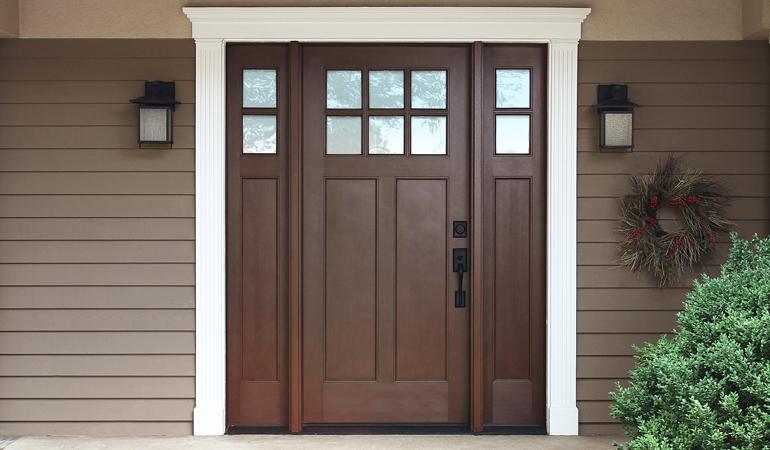
Credit: houseofworley.com
Introduction To Staining Fiberglass Doors
Staining fiberglass doors can add a touch of elegance and warmth to your home. It enhances the door’s appearance, making it look like natural wood. This process is not only for aesthetics but also for protection. Staining helps to preserve the door and extend its lifespan. Let’s dive into the details of staining fiberglass doors.
Benefits Of Staining
Staining fiberglass doors offers several benefits. Firstly, it enhances the door’s visual appeal. A stained door can mimic the look of high-quality wood. This gives your home a sophisticated look. Secondly, staining helps to protect the door. It acts as a sealant, preventing moisture and dirt from penetrating the surface. This makes the door more durable. Lastly, staining is a cost-effective way to upgrade your home’s exterior. You get the beauty of wood without the high maintenance.
Types Of Stains
There are different types of stains available for staining fiberglass doors. Each type offers unique benefits. Here are the most common ones:
- Oil-Based Stains: These stains are durable and provide a rich color. They penetrate deeply into the fiberglass.
- Water-Based Stains: These are easy to clean up and dry quickly. They are environmentally friendly.
- Gel Stains: These stains are thick and provide an even finish. They are less likely to drip and are easy to apply.
Choosing the right stain depends on your needs and preferences. Each type has its advantages, so consider what is most important to you.
Gathering Necessary Materials
Gather all necessary materials before staining your staining fiberglass doors. This includes sandpaper, stain, brushes, and a clean cloth.
Before starting your fiberglass door staining project, gather all the necessary materials. This step ensures you have everything on hand. No interruptions. Let’s look at the essential tools and the right stain.
Tools Needed
To stain your fiberglass door, you need specific tools. These include:
- A good quality brush or foam brush
- Sandpaper (220 grit)
- Clean rags or tack cloth
- Painter’s tape
- Drop cloth or plastic sheets
- Rubber gloves
These tools help you achieve a smooth, professional finish. Ensure all tools are clean and in good condition.
Choosing The Right Stain
Selecting the right stain is vital. Fiberglass doors require specific types of stains. Look for a gel stain. It works best on fiberglass. Gel stains provide a rich, even color. They are easy to apply and control. Choose a color that matches your decor. Remember, lighter colors highlight details. Darker colors give a bold, dramatic look.
Preparing The Door
Preparing your staining fiberglass doors is key to achieving a smooth and long-lasting stain. This crucial step involves thorough cleaning and proper sanding. Below, we will outline the steps for preparing your door for staining.
Cleaning The Surface
Before you start sanding, you need to clean the door’s surface. Use a mild detergent mixed with water. Apply the solution with a soft cloth. Make sure to remove any dirt, grease, or grime.
- Mix mild detergent with water.
- Use a soft cloth to clean the surface.
- Remove all dirt, grease, and grime.
After cleaning, rinse the door with clean water. Dry it completely with a lint-free cloth. Make sure there is no moisture left on the surface.
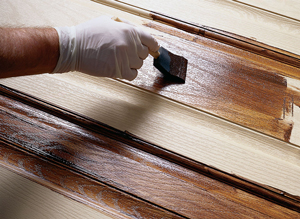
Sanding Techniques
Once the door is clean, it’s time to sand. Sanding helps the stain adhere better. Use fine-grit sandpaper, around 220 grit. Sand the surface gently in the direction of the grain.
- Use 220-grit sandpaper.
- Sand gently in the direction of the grain.
- Ensure the surface is smooth.
After sanding, remove all sanding dust. Use a vacuum or a tack cloth. A clean surface ensures a perfect finish. Following these steps will prepare your fiberglass door for a beautiful stain. A clean and smooth surface is essential for the stain to look its best.

Credit: www.reddit.com
Applying The Stain
Applying the stain to your fiberglass door can transform its look and feel. It involves several steps to ensure a smooth and even finish. This guide will help you apply the stain like a pro.
Stain Application Methods
There are several methods to apply stain to your fiberglass door. Each method offers unique benefits:
- Brush: A brush allows for detailed and controlled application.
- Rag: Using a rag can help create a soft, blended finish.
- Foam Applicator: Foam applicators are great for even coverage.
Choose the method that suits your skills and the look you want.
Ensuring Even Coverage
Even coverage is crucial for a professional finish. Here are some tips:
- Prepare the Surface: Clean the door thoroughly before staining.
- Test the Stain: Test the stain on a small, hidden area first.
- Work in Sections: Apply the stain in small sections to ensure even coverage.
- Wipe Excess Stain: Wipe off any excess stain with a clean rag.
- Check for Drips: Look for and remove any drips immediately.
Following these steps ensures your fiberglass door looks beautiful and professional.
Drying And Curing
Once you have stained your fiberglass door, it is crucial to understand the drying and curing process. Proper drying and curing ensure the stain lasts and looks great. Let’s break down these essential steps.
Drying Time
The drying time for a stained fiberglass door can vary. Factors like humidity, temperature, and the type of stain used will affect it. Generally, it takes about 24 to 48 hours for the stain to dry.
Here are some tips to ensure optimal drying:
- Keep the door in a well-ventilated area.
- Maintain a temperature of 70°F (21°C).
- Avoid direct sunlight on the door while drying.
Check the manufacturer’s instructions for specific drying times.
Curing Process
The curing process is vital for the stain to fully bond with the fiberglass. Curing usually takes between 7 to 10 days. During this time, the stain hardens and reaches its maximum durability.
To ensure proper curing:
- Do not use the door until fully cured.
- Keep the area dust-free.
- Maintain a stable temperature and humidity level.
Here’s a quick reference table for drying and curing:
| Process | Time | Conditions |
|---|---|---|
| Drying | 24-48 hours | Well-ventilated, 70°F (21°C) |
| Curing | 7-10 days | Dust-free, stable temperature |
By following these steps, your fiberglass door will have a beautiful and lasting finish.
Applying A Protective Finish
After you have successfully stained your fiberglass door, the next crucial step is to apply a protective finish. This finish will protect the door from UV rays, moisture, and daily wear and tear. A good protective finish ensures that your door remains beautiful and durable for years.
Types Of Finishes
There are several types of finishes available for staining fiberglass doors. Each type has its own advantages.
| Finish Type | Description |
|---|---|
| Polyurethane | Highly durable and provides a glossy finish. |
| Varnish | Offers a natural look and superior protection. |
| Spar Urethane | Ideal for outdoor use, resistant to water and sunlight. |
Applying The Finish
To apply the finish, follow these steps:
- Clean the door surface with a damp cloth to remove any dust.
- Use a fine-grit sandpaper to lightly sand the surface. This helps the finish adhere better.
- Stir the finish thoroughly. Do not shake the can to avoid bubbles.
- Using a high-quality brush, apply the finish in thin, even coats. Brush in the direction of the grain.
- Let the first coat dry completely, following the manufacturer’s instructions.
- Lightly sand the surface between coats to remove any imperfections.
- Apply at least two to three coats for optimal protection.
Remember, proper application of the finish is key to a long-lasting and beautiful door. Take your time and ensure each coat is applied evenly and allowed to dry fully before the next.
Maintenance Tips
Maintaining a stained fiberglass door ensures its beauty and longevity. Regular upkeep can prevent damage and keep the door looking fresh. Here are some tips to help you maintain your fiberglass door.
Regular Cleaning
Clean your fiberglass door at least once a month. Use a soft cloth and mild soap. Avoid abrasive cleaners that can scratch the surface. Rinse with water and dry with a clean towel. This removes dirt and grime, keeping the door spotless.
Touch-up Techniques
Inspect your door for any scratches or chips. Use a matching stain or touch-up marker. Apply it gently to the affected area. Let it dry completely. This helps maintain the door’s appearance and protects the wood-like finish. Regular touch-ups can keep your door looking new.
Credit: myoldmasters.com
Troubleshooting Common Issues
Staining a fiberglass door can enhance its look. But sometimes, problems occur. Understanding common issues helps ensure a smooth finish. Below are solutions to two frequent problems: uneven stain and peeling or cracking.
Uneven Stain
Uneven stain can ruin the door’s appearance. This often happens due to poor preparation or application. Here are steps to fix it:
| Problem | Cause | Solution |
|---|---|---|
| Blotchy Areas | Poor surface cleaning |
|
| Dark Spots | Excess stain in one area |
|
Peeling Or Cracking
Peeling or cracking is another common issue. It can make your door look old and worn out. Addressing the root cause can help prevent this.
- Inspect the Surface: Ensure the door is clean and dry before staining.
- Use Quality Products: Cheap stains or sealers can lead to poor adhesion.
- Apply Thin Coats: Thick layers of stain or sealer can cause cracking.
- Allow Proper Drying Time: Each coat should dry completely before the next.
If peeling or cracking occurs, follow these steps:
- Sand the affected area to remove loose stain.
- Clean the area to remove dust.
- Reapply the stain in thin, even coats.
- Seal with a high-quality clear coat.
By addressing these issues, you can achieve a beautiful and long-lasting finish on your fiberglass door.
Frequently Asked Questions
How Do You Stain A Fiberglass Door?
First, clean the door thoroughly. Apply a gel stain using a brush or cloth. Wipe off excess stain. Allow it to dry completely.
Can You Stain Fiberglass Doors?
Yes, fiberglass doors can be stained. Use a gel stain for best results. It mimics the look of wood.
What Kind Of Stain To Use On Fiberglass?
Use a gel stain specifically designed for fiberglass. It adheres well and provides a realistic wood-like finish.
Do You Need To Sand A Fiberglass Door Before Staining?
No, sanding is not required. Simply clean the door thoroughly before applying the gel stain for best results.
Conclusion
Staining a fiberglass door can be a simple, satisfying project. It adds charm and protects your door. With the right tools and steps, you achieve great results. Remember to clean and prep the door thoroughly. Choose a stain that suits your home’s style.
Apply evenly and allow drying time. The result? A beautiful, durable finish. Enjoy the refreshed look of your fiberglass door. Happy staining!


1 Comment
This is the kind of writing that invites you to slow down and savor every line.