Bathroom Mirror Trim Molding: Elevate Your Space with Stylish Details
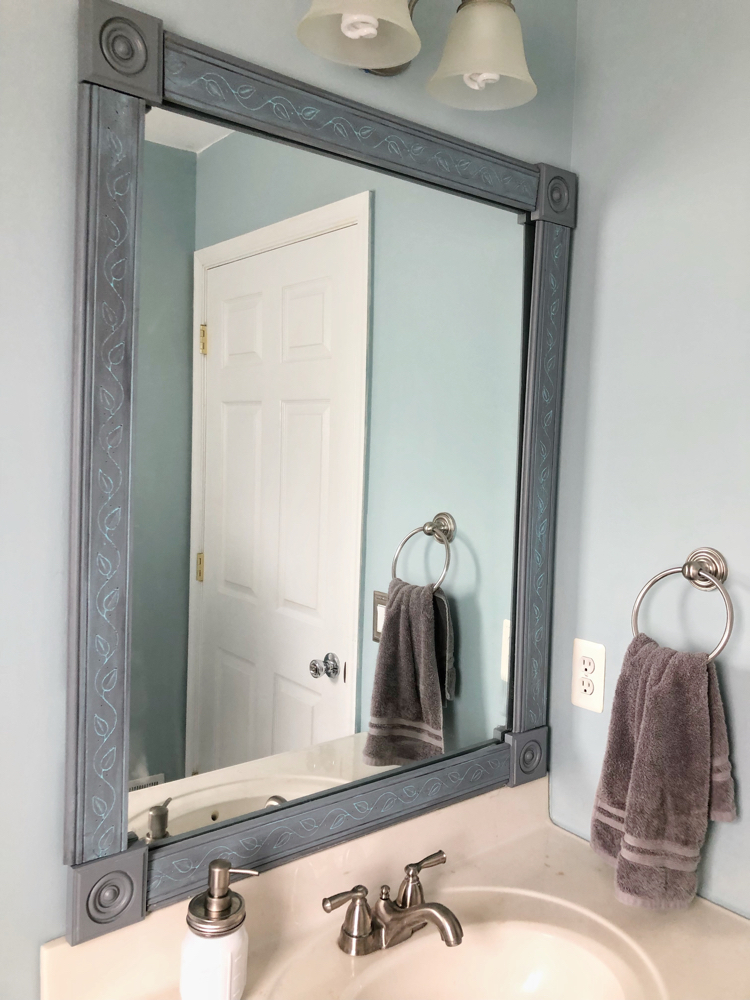
Transform your bathroom with bathroom mirror trim molding. It’s a simple upgrade. A bathroom mirror is more than a reflection tool. It can also be a stylish focal point. Mirror trim molding adds a touch of elegance and sophistication. This simple addition can change the look of your bathroom. Whether you prefer a modern or classic style, trim molding offers flexibility.
It provides a neat, finished appearance that enhances your mirror. Plus, it’s an easy DIY project. With the right materials, anyone can do it. Ready to learn more about this stylish upgrade? Let’s dive into the world of bathroom mirror trim molding and see how it can elevate your space.
Introduction To Mirror Trim Molding
Bathroom mirror trim molding adds a stylish touch to any bathroom mirror. It enhances the look and creates a finished appearance. Simple to install, it offers an easy way to upgrade your bathroom decor.
Bathroom mirror trim molding can transform the look of your bathroom. It adds elegance and style without a major renovation. This simple addition makes a big difference.
What Is Mirror Trim Molding?
Mirror trim molding is a decorative frame for your bathroom mirror. It comes in various styles and materials. You can choose wood, plastic, or metal trims. Each type adds a unique touch to your mirror.
Benefits Of Adding Trim
Adding trim to your mirror enhances its appearance. It hides any unsightly edges or damage. Trim molding also makes the mirror look larger and more polished. It can match other bathroom fixtures, creating a cohesive look.

Credit: southgeorgiastyle.com
Choosing The Right Trim Style
Choosing the right trim style for your bathroom mirror can transform the space. Mirror trim molding adds elegance and character. It enhances the overall look of your bathroom. With so many styles and materials available, selecting the perfect trim can be overwhelming. Here, we break down popular designs and materials to help you make the best choice.
Popular Trim Designs
Several trim designs can suit different bathroom styles. Classic designs often feature intricate patterns and ornate details. These work well in traditional bathrooms. For a modern look, sleek and simple trims are ideal. They provide a clean and minimalist appearance. Rustic trims, with their natural wood finishes, add a touch of warmth. They are perfect for farmhouse or cottage-style bathrooms. Contemporary designs often combine materials and textures. They create unique and eye-catching trims.
Materials For Mirror Trim
Choosing the right material for your mirror trim is crucial. Wood is a popular choice for its versatility. It can be painted or stained to match your bathroom decor. MDF (Medium-Density Fiberboard) is a budget-friendly option. It offers a smooth finish and is easy to work with. Metal trims, like aluminum or stainless steel, provide a modern touch. They are durable and easy to clean. Polystyrene trim is lightweight and moisture-resistant. It’s an excellent choice for bathrooms with high humidity. Lastly, PVC (Polyvinyl Chloride) trim is both affordable and water-resistant. It’s perfect for bathrooms exposed to lots of water.
Tools And Materials Needed
Starting your bathroom mirror trim molding project requires the right tools and materials. Having everything ready helps the process go smoothly and ensures a professional look.
Essential Tools
- Measuring Tape: Accurate measurements are crucial.
- Miter Saw: For precise angle cuts on the trim.
- Level: Ensures your trim is straight and even.
- Nail Gun: Speeds up the nailing process.
- Hammer: Useful for securing nails.
- Utility Knife: For trimming and cutting excess material.
Additional Supplies
- Trim Molding: Choose a style that matches your bathroom decor.
- Primer and Paint: To finish and protect the trim.
- Wood Filler: To fill gaps and nail holes.
- Sandpaper: Smooths the trim surface.
- Painter’s Tape: For clean paint lines.
- Adhesive: Helps secure the trim to the mirror.
- Caulk: Seals gaps between the trim and wall.
Below is a table summarizing the tools and materials you will need:
| Category | Item |
|---|---|
| Tools | Measuring Tape |
| Tools | Miter Saw |
| Tools | Level |
| Tools | Nail Gun |
| Tools | Hammer |
| Tools | Utility Knife |
| Materials | Trim Molding |
| Materials | Primer and Paint |
| Materials | Wood Filler |
| Materials | Sandpaper |
| Materials | Painter’s Tape |
| Materials | Adhesive |
| Materials | Caulk |
Gathering these tools and materials before you start ensures a smooth and efficient project. It saves time and reduces frustration, making your bathroom mirror trim molding project enjoyable.

Credit: www.classicstylehome.com
Preparing Your Mirror
Preparing your mirror for trim molding is an essential step. It ensures a smooth and professional finish. This process involves two main tasks: cleaning the surface and measuring and marking.
Cleaning The Surface
Before attaching trim molding, make sure the mirror’s surface is clean. Dust and grime can prevent the molding from sticking properly. Follow these steps to clean your mirror:
- Use a soft cloth to wipe the mirror.
- Apply a glass cleaner to the cloth, not the mirror.
- Wipe in a circular motion to avoid streaks.
- Pay attention to the edges where the trim will go.
For stubborn spots, use a mixture of water and vinegar. Avoid using harsh chemicals that can damage the mirror.
Measuring And Marking
Accurate measurements are crucial for a perfect trim fit. Here’s how to measure and mark your mirror:
- Use a tape measure to find the mirror’s height and width.
- Write down these measurements. Double-check for accuracy.
- Measure the trim pieces, adding extra length for mitered corners.
- Mark the mirror where the trim will be placed.
- Use a pencil for light markings that can be erased.
If your mirror has rounded corners, adjust your trim accordingly. Custom-cut pieces might be necessary. Following these steps will help ensure your trim molding fits well and looks great.
Cutting And Fitting The Trim
Cutting and fitting the trim for your bathroom mirror can add a touch of elegance. This process requires patience, precision, and the right tools. Let’s dive into the steps to ensure a perfect fit.
Measuring And Cutting
Start by measuring the dimensions of your mirror. Use a tape measure to get the exact length and width. Write these measurements down.
Next, transfer these measurements to your trim molding. Mark the points where you will cut. Use a miter saw for accurate cuts. Set the saw to a 45-degree angle for corner joints. This ensures the pieces fit together neatly.
Tools you need:
- Tape measure
- Pencil
- Miter saw
- Safety goggles
Dry Fitting The Pieces
Before attaching the trim, do a dry fit. This helps ensure all pieces align correctly. Place each piece of trim around the mirror. Check the corners to make sure they meet perfectly. If you notice gaps, adjust your cuts. Small adjustments can make a big difference. Use sandpaper to smooth out any rough edges.
Steps for dry fitting:
- Place trim pieces around the mirror.
- Check corner joints for alignment.
- Make necessary adjustments.
- Sand any rough edges.
Once everything fits well, you are ready to attach the trim permanently. This step ensures your mirror looks polished and professional.
Installing The Trim Molding
Enhance your bathroom’s look with stylish mirror trim molding. This simple addition adds elegance and a polished finish. Install easily for an instant upgrade.
Adding trim molding to your bathroom mirror can transform the look. It creates a finished and polished appearance. The process is simple and can be done by anyone.
Adhesive Application
Start by cleaning the mirror frame. Remove any dust or grime. Measure the length of each side of the mirror. Cut the molding to fit these measurements. Use a miter saw for angled cuts. Apply a strong adhesive to the back of the molding. Place the adhesive in small dots along the entire length.
Securing The Trim
Carefully press the molding onto the mirror frame. Hold it in place for a few minutes. Ensure the molding is aligned properly. Use painter’s tape to secure the molding while the adhesive dries. Allow the adhesive to set for at least 24 hours. Remove the painter’s tape gently. Check the molding for any loose sections. Press them down if needed.
Finishing Touches
The final steps in installing bathroom mirror trim molding can make a big difference. These finishing touches ensure a polished and professional look. Attention to detail at this stage can transform your bathroom mirror.
Caulking And Sealing
Caulking the edges of the trim is crucial. It prevents moisture from seeping in. This step protects the trim and the wall. Use a caulk gun for precise application. Choose a caulk that matches your trim color.
After applying, smooth the caulk with a damp finger. This creates a clean line. Allow the caulk to dry completely before moving on. Sealing ensures longevity. It keeps the trim looking fresh and new.
Painting Or Staining
Painting or staining the trim adds the final touch. It enhances the overall appearance. Choose a paint or stain that complements your bathroom decor. For a modern look, opt for a sleek, glossy finish. Staining can highlight the natural beauty of wood trim. Apply a primer first if you’re painting. This helps the paint adhere better. Use a brush for detailed work. A roller can cover larger areas quickly.
Allow the paint or stain to dry thoroughly. Add a second coat if needed. Your bathroom mirror trim will now look complete and stylish.
Maintaining Your Trimmed Mirror
Bathroom mirror trim molding adds elegance to any bathroom. To keep it looking new, regular maintenance is key. Proper care extends the life of your trimmed mirror and keeps it shining. Below are some tips to maintain your trimmed mirror effectively.
Cleaning Tips
Use a soft cloth for daily cleaning. Avoid abrasive cleaners. Mix mild soap with warm water for a gentle clean. Wipe the trim gently to remove dust and grime. Dry the trim with a clean, dry cloth to prevent water spots.
For tough stains, use a mixture of vinegar and water. Spray the solution on the trim, then wipe with a soft cloth. Avoid using too much water to prevent damage to the trim.
Repairing Damage
Inspect your trim regularly for any damage. Small scratches can be fixed with a touch-up pen. Choose a pen that matches the color of your trim. Apply the pen gently over the scratch and let it dry. For larger damages, consider wood filler. Apply the filler to the damaged area and smooth it out. Once dry, sand it lightly to blend with the trim. Repaint the area if necessary to match the rest of the trim.
If the trim is severely damaged, replacement might be the best option. Consult a professional for proper replacement to ensure a seamless look.
Credit: www.youtube.com
Frequently Asked Questions
What Is Bathroom Mirror Trim Molding?
Bathroom mirror trim molding is decorative framing that surrounds your bathroom mirror. It enhances aesthetics and hides unfinished edges.
How To Install Mirror Trim Molding?
To install mirror trim molding, measure the mirror, cut the molding, and attach it using adhesive or nails.
What Materials Are Used For Trim Molding?
Common materials for trim molding include wood, plastic, and metal. They vary in durability and style.
Can I Paint My Mirror Trim Molding?
Yes, you can paint mirror trim molding. Choose a paint that suits the material and complements your bathroom decor.
Conclusion
Adding trim molding to your bathroom mirror can enhance its look. It’s a simple project with a big impact. The trim adds elegance and style. Plus, it’s cost-effective and easy to do yourself. You just need the right materials and some time.
Give your bathroom a fresh feel. Try installing mirror trim molding today. Your bathroom will look more polished and inviting.